How to Make 3D Jewelry (Complete Guide)
What 3D Jewelry Making Really Means
When people search how to make 3d jewelry, they often imagine pressing a button and watching a printer create a finished ring. The reality is more practical. In most professional workflows, 3D jewelry starts as a digital model. That model is then checked, adjusted, and used for prototyping, wax or resin output, casting, stone setting, and finishing.
Think of the 3D file as your technical blueprint. It controls shape, scale, stone layout, wall thickness, symmetry, and many production details before any metal is cast. This is why digital work matters so much. A clean file can save time, reduce sampling costs, and make communication easier between designer and manufacturer.
Now, when it comes to the learning curve, beginners do best when they treat 3D design as jewelry problem-solving, not just software training. If you want to learn 3d jewelry modeling well, focus on how a piece will be worn, cast, polished, and set, not only how it looks on screen.
The Tools and Skills You Need First

Start with the right software mindset
You do not need every program on the market. For beginners, one jewelry-friendly CAD tool is enough. The goal is to understand curves, measurements, surfaces, stone settings, and export files correctly. Many designers begin with Rhino plus jewelry plugins, Matrix-style workflows, or other CAD platforms built for precise modeling.
What many people overlook is that jewelry software is only one part of the system. You also need visual discipline. You should be able to read dimensions, compare profiles, and judge whether a claw is too thin or a gallery too heavy.
Basic skills worth learning before your first model
- Ring size and product measurements
- Stone dimensions and setting clearance
- Minimum thickness for metal parts
- Symmetry and balance in wearable design
- Exporting STL or 3DM files cleanly
Consider this: a simple pendant with clean surfaces is a better first project than a halo ring with pavé and moving parts. Before building your own complex style library, spend time reviewing 3d model examples so you can see what a production-minded file looks like.
A Beginner Step-by-Step 3D Jewelry Workflow
Step 1: Choose one simple product
Your first design should be easy to measure and easy to inspect. Good beginner options include a signet ring, solitaire ring, bar pendant, bezel pendant, or basic stud earring. Avoid hinges, chains, multiple assembled components, and micro pavé at the start.
In practice, this means you can spend more time learning form and less time fixing technical failures.
Step 2: Build from exact dimensions
Start with real numbers, not guesses. If your center stone is 6.5 mm, model around that size exactly. If your ring shank needs to finish at 1.8 mm thick after polishing, do not design it at 1.8 mm in CAD. Add a sensible margin for finishing loss.
The reality is that beginners often make beautiful renders and unusable files because they treat scale too casually.
Step 3: Block out the main form first
Create the core silhouette before adding decorative details. For a ring, that means shank, head, shoulders, and stone seat. For a pendant, focus on front face, thickness, back structure, and bail connection. Keep shapes simple until the proportions feel right from every angle.
Step 4: Add functional details
Now add prongs, bezels, seats, cutouts, galleries, or texture zones. This is where you begin to think like a manufacturer. Ask yourself whether the setter can access the stone, whether polishers can reach recessed areas, and whether the piece will trap too much excess metal during casting.
If you want more context on how digital design speeds sample development, see How Use CAD Technology Faster Jewelry Prototyping.
Step 5: Check wearability and strength
Rotate the model and inspect it from top, side, bottom, and perspective view. Look for overly sharp edges, thin joins, top-heavy structures, or uncomfortable under galleries. A design can look refined in render view and still wear poorly in real life.
Step 6: Prepare the file for output
Before printing or sharing with a factory, make sure your geometry is closed, manifold, and scaled correctly. Remove overlapping surfaces, open edges, and unnecessary hidden geometry. Clean file prep matters because every flaw can become a print problem or casting problem later.
Step 7: Prototype before full production
This is where digital work becomes tangible. Print the design in resin or wax, inspect it physically, and make changes while costs are still manageable. A manufacturer like Royi Sal Jewelry, established in Bangkok in 2001, often uses 3D development as part of a larger sampling workflow because it helps brands spot proportion and production issues early.
How to Design for Real Production, Not Just for Screens
Understand manufacturing limits early
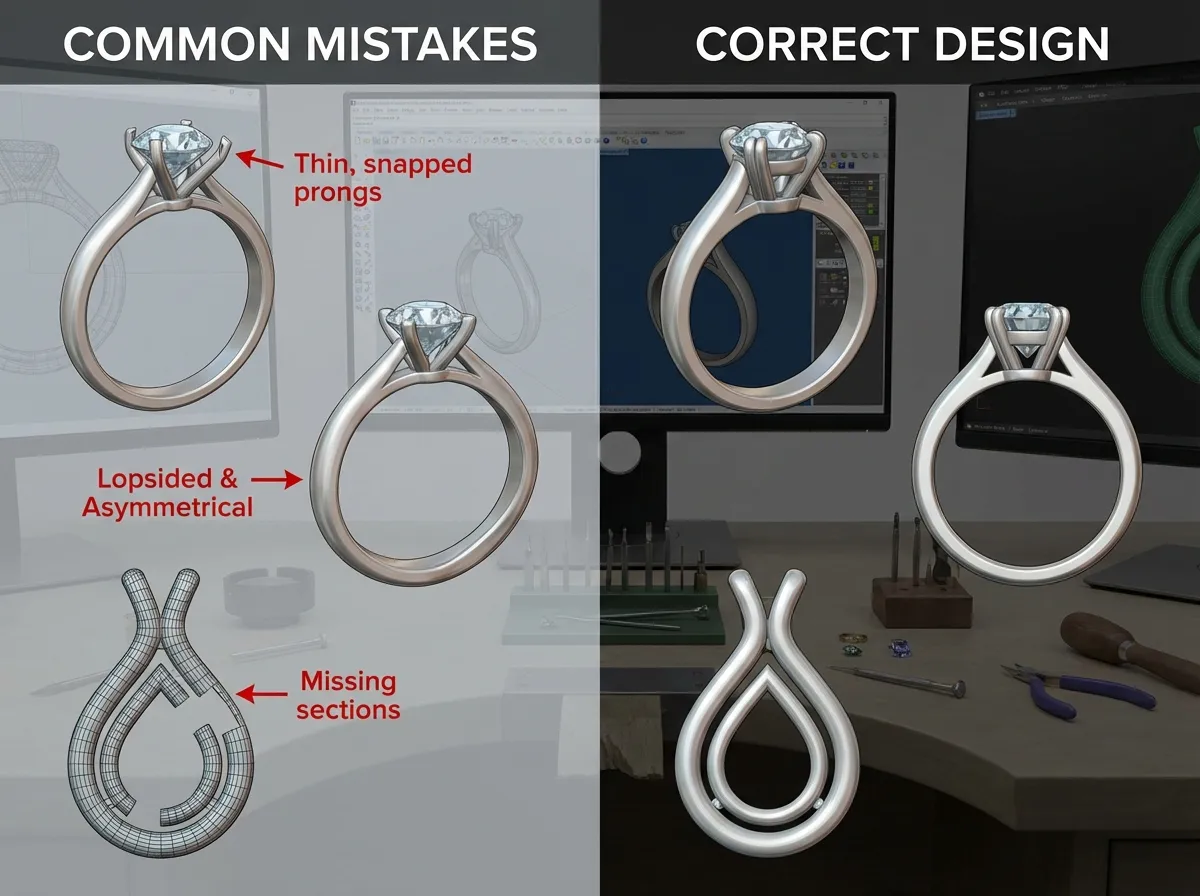
Many beginner tutorials focus on rendering, but manufacturers focus on output. If a prong is too thin, it may fail in casting or bend during setting. If engraving is too shallow, polishing may soften it. If a back plate is too wide and flat, porosity risk can increase depending on the design and casting conditions.
From a practical standpoint, the smartest way to make your own jewelry digitally is to design with the next step in mind.
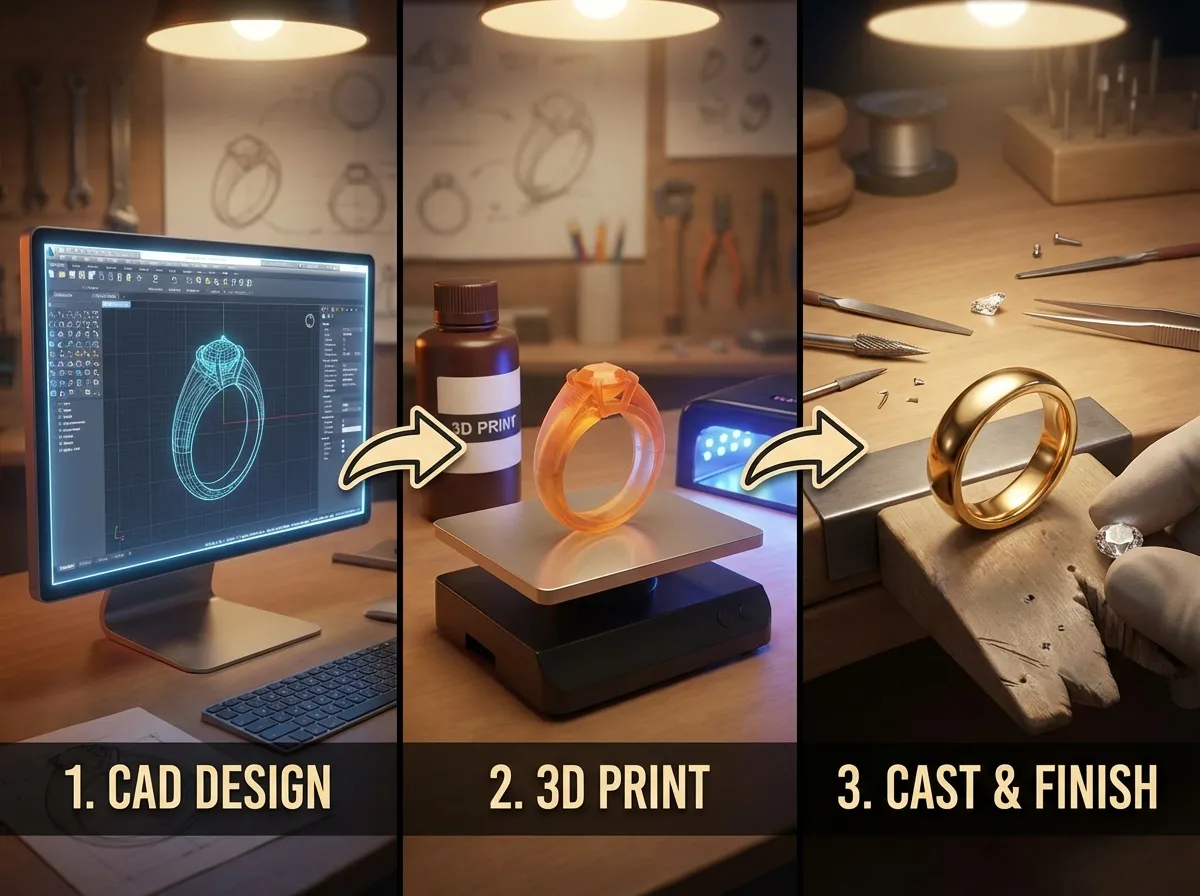
Think through the full chain of production
A 3D model usually moves through these stages:
- CAD design
- 3D print or wax output
- Rubber mold or direct casting path
- Metal casting
- Assembly and soldering if needed
- Stone setting
- Polishing and plating
- Final quality control
One design decision affects every stage after it. That is why design reviews matter so much when brands and suppliers work together. You can see that relationship more clearly in jewelry designers oem manufacturers collaborate create unique collections.
Use service support when you reach the limits of DIY
If you are moving from learning into product development, reviewing a manufacturer’s Services page or its Customer Journey can help you understand where design, sampling, and production handoffs usually happen. That is useful even if you are still building your first collection, because it shows what information a factory will expect from you.
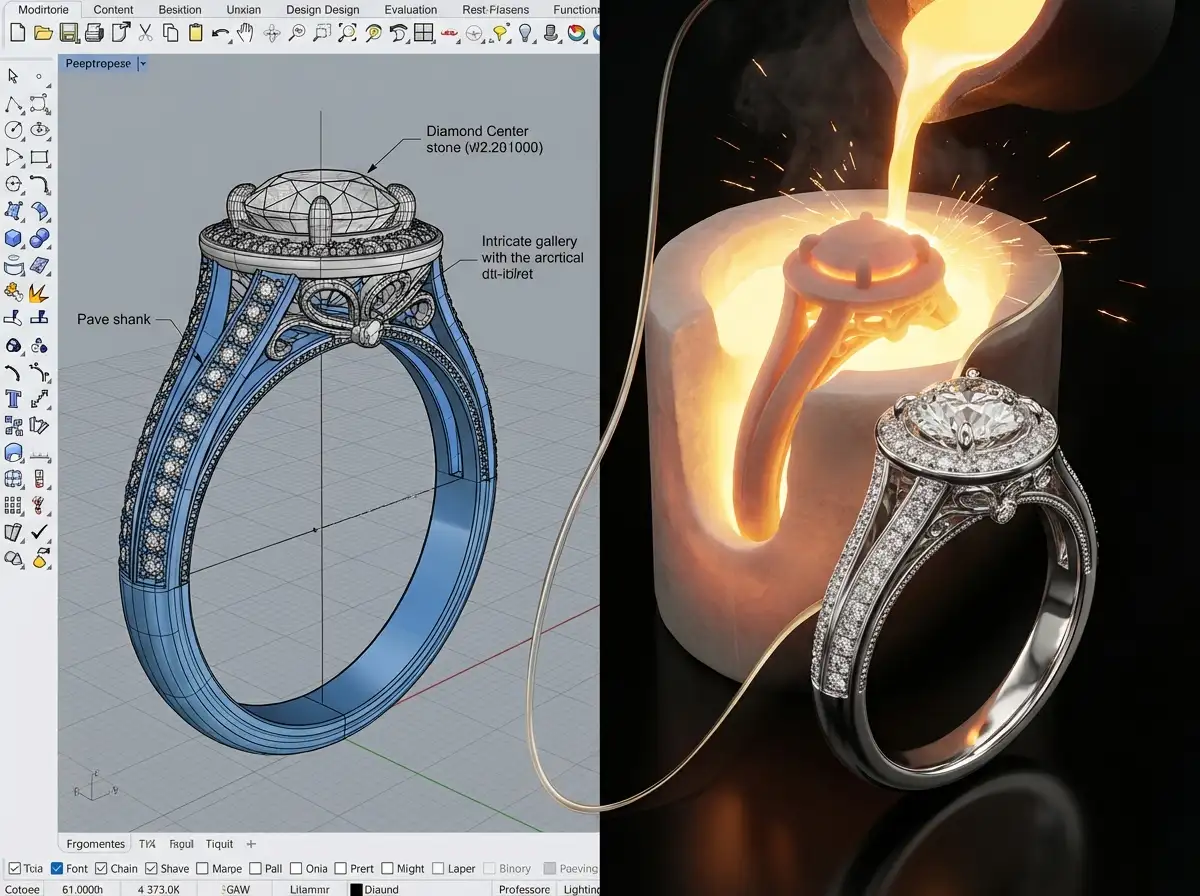
How 3D Jewelry Moves From CAD to Casting
Understand what happens after the file leaves your screen
Many guides stop at modeling, but readers often need the next part explained clearly. Once your CAD file is approved, it is usually exported for a print stage in castable resin or wax-like material. That printed pattern becomes part of a casting workflow, often through lost wax casting, where the pattern is invested, burned out, and replaced by molten metal.
Here’s the thing, this production path is exactly why file quality matters so much. If the geometry is weak, surfaces intersect badly, or fine details are too delicate, the problem rarely disappears on its own. It usually shows up later during printing, casting, cleanup, or setting.
Know where digital precision still needs bench judgment
Even when the model is highly accurate, the finished piece still depends on human skill. Casting sprues need smart placement. Rough surfaces need cleanup. Stones need secure seating. High-polish areas may require slight form adjustments so the piece still looks balanced after finishing. Digital jewelry is not a shortcut around craftsmanship. It is a way to control more decisions earlier.
What many people overlook is that a well-made 3D model does not replace the bench. It supports the bench. That mindset helps beginners make better choices from the start.
How to Choose Materials and Output Methods
Match the model to the metal
Silver, gold, brass, and platinum each create different design pressures. Softer metals may need stronger support in certain structures. Heavier metals can change comfort and balance. Finishing behavior also varies, which means edge sharpness, engraving depth, and wall thickness should never be treated as one-size-fits-all.
The reality is that beginners often ask for a single file to work perfectly in every material. Sometimes that is possible. Sometimes it is smarter to adjust the model slightly for the intended metal so the final result looks and performs better.
Choose the right output path for the stage you are in
If you are still learning, a resin prototype may be enough to judge scale, proportions, and finger coverage. If you are preparing for sales samples, you may need a cast metal version to review weight, comfort, finish, and setting performance. For some simple designs, direct casting from a printed pattern can be efficient. For others, a mold-based approach makes more sense once repeat orders or multiple sizes are involved.
Think of it this way. Your output method should answer the question you are trying to solve. Are you checking looks, wearability, manufacturability, or repeat production? The right next step depends on that answer.
Common Mistakes Beginners Make
The first mistake is trying to learn everything at once. You do not need advanced sculpting, parametric design, rendering, animation, and production engineering on day one. Start with structure, scale, and clean geometry.
The second mistake is copying fashion images without understanding construction. A reference photo does not tell you hidden thickness, stone seat angle, or assembly points. A good 3D jewelry design tutorial should teach those hidden details.
The third mistake is ignoring material behavior. Silver, brass, and gold do not behave identically in casting and finishing. If your goal is sterling silver production, your design also needs to survive wear and cleaning over time. Later, once pieces are made, proper care matters too. That is why maintenance content like 5 steps to make your sterling silver jewelry look like new becomes relevant after production.
The fourth mistake is skipping physical sampling. Screen-perfect is not the same as hand-perfect.
How 3D Design Supports a Jewelry Business
If you plan to sell jewelry, 3D design is not just a creative skill. It is a business tool. It can shorten revision cycles, make quote requests more accurate, and help you test a collection before committing to larger runs.
Think of it this way. When you know how to make 3d jewelry properly, you are not only making a file. You are making decisions that affect margin, lead time, and product consistency. A cleaner design file often means fewer back-and-forth emails, faster sample approval, and more predictable production results.
For startup brands, this is especially valuable. Instead of investing in a full bench setup to make every item by hand, you can create a digital line, prototype selected pieces, and decide what deserves production. Royi Sal Jewelry is one example of a manufacturer that supports OEM and ODM development with sample-oriented workflows, which can be helpful when your design vision is strong but your in-house production capacity is limited.
If you want to understand how factories present this process in practice, Royi Sals 3D Sampling Workflow gives a useful behind-the-scenes reference.
Should You Hand Make, Outsource, or Build In-House?
Choose based on your stage, not ego
One practical gap in many beginner conversations is the business decision behind production. You may be able to design a piece yourself but still outsource printing, casting, or finishing. That is normal. In fact, it is often the most efficient way to learn without overinvesting too early.
If you hand make everything, you keep direct control but limit speed and repeatability. If you outsource selectively, you gain access to equipment and specialized technicians without carrying the full overhead. If you build an in-house setup later, it should be because your order volume and revision needs justify it, not because it sounds more professional.
Use each model for what it does best
Handmaking is strong for one-off artistry, direct material experimentation, and certain bench-led styles. Outsourcing is strong for rapid sampling, casting support, and scaling a collection without building every process internally. In-house digital development can make sense when you have steady product turnover, repeated design revisions, or a team already comfortable managing CAD and sample coordination.
From a practical standpoint, the best workflow is usually the one that gives your brand consistent quality without creating unnecessary complexity.
Frequently Asked Questions
What is the best way for a beginner to start learning 3D jewelry design?
Start with one simple piece and one software platform. A basic ring, pendant, or stud earring will teach you proportion, thickness, symmetry, and file prep without overwhelming you. Focus on design logic before advanced rendering. Learn how stones sit, how metal needs support, and how a piece will be cast and polished. That foundation matters more than fancy visuals. If you build good habits early, you will improve much faster and create files that are actually usable for production.
Do I need a 3D printer to make 3D jewelry?
No, not at the beginning. You can design the piece digitally and outsource the printing or sampling stage to a service bureau or manufacturer. Many designers do exactly that. The key is to create a clean, correctly scaled file first. Once you are producing regularly, owning a printer may help with speed and iteration, but it is not required to learn. For many beginners and small brands, outsourcing is more practical because it reduces equipment cost and maintenance headaches.
Which jewelry pieces are easiest to model first?
Simple pendants, signet rings, solitaire rings, and clean stud earrings are among the easiest first projects. They let you focus on structure and dimensions without getting buried in small details. Avoid pieces with hinges, pavé, chain articulation, or multiple assembly points until you understand core modeling principles. A first project should teach you how to control shape and thickness. It should not become a rescue mission for technical errors you are not ready to solve yet.
How long does it take to learn how to make 3D jewelry well?
You can learn the basics in weeks, but building production-ready skill takes longer. Most people can create a simple beginner model fairly quickly if they practice consistently. What takes time is learning judgment: how thick a part should be, where failures happen in casting, and how design choices affect stone setting and finishing. The good news is that you do not need expert-level mastery to begin developing a collection. You need enough skill to create clear, workable files and improve from real feedback.
Is 3D jewelry design only useful for large manufacturers?
Not at all. Small brands, independent designers, and e-commerce sellers benefit from it just as much. In many cases, they benefit even more because digital design reduces trial-and-error costs. You can test ideas before investing in inventory, show realistic concepts to partners, and keep a library of editable designs for future collections. That flexibility matters when you are managing limited budgets. Digital workflows help you stay organized, revise faster, and communicate more clearly with production partners.
What file format is usually used for 3D jewelry printing or casting?
STL is one of the most common output formats for printing because it represents the model as a mesh. Some teams also work with native CAD files such as 3DM for editing and revisions. What matters most is that the file is clean, scaled correctly, and free from open edges or broken geometry. A bad STL can create problems even if the design looks fine on screen. Always inspect the file before sending it out for sampling or manufacturing.
Can I use 3D jewelry design to create products for sale?
Yes, and many modern brands do exactly that. A digital workflow is especially useful if you want to test small collections, create custom variations, or prepare designs for OEM or ODM production. Just remember that selling requires more than a good render. You need a wearable product, reliable sampling, quality control, and clear specifications. If your goal is how to make jewelry to sell, then production planning matters as much as creativity. A beautiful file only becomes a product when it performs well in real manufacturing.
How is 3D jewelry different from handmaking or wire work?
3D jewelry design is a digital design method, while handmaking and wire work are physical bench techniques. If you are searching how to make wire jewelry, you are working directly with tools and material by hand. In digital design, you build the form on screen first, then move to prototyping and production. Neither method is automatically better. They suit different goals. Digital design is excellent for repeatability, revisions, and production planning. Handmade methods offer direct tactile control and a different kind of artistry.
What should I check before sending a 3D jewelry file to a manufacturer?
Check scale, metal thickness, stone sizes, seat depth, symmetry, and closed geometry. Review the model from multiple views, not only the top. Make sure hidden areas are accessible for polishing and that stone setting looks realistic. Label any critical dimensions clearly. If the piece has assembly points, indicate them. This step saves time because manufacturers can quote and review faster when your file is clear. It also helps avoid misunderstandings that cause sample delays or costly revisions later.
Do I need manufacturing knowledge if I only want to design?
Yes, at least at a practical level. You do not need to become a caster or setter, but you should understand how your design will be made. That knowledge helps you avoid fragile prongs, impossible undercuts, or decorative details that disappear in finishing. Consider this part of becoming a stronger designer. The more you understand production, the easier it becomes to make designs that look good and work well. That is true whether you are creating one custom piece or planning a full branded collection.
Can 3D printed jewelry be worn as the final product?
Sometimes, but not usually in the way beginners first imagine. In most fine jewelry workflows, the printed part is a temporary pattern used for casting, not the final wearable piece. Some fashion or concept pieces may be worn directly if printed in suitable material, but for precious metal jewelry, printing is commonly one stage in a larger manufacturing process. If your goal is saleable fine jewelry, assume the print is a development step unless your production method is intentionally built around direct final-material printing.
What is lost wax casting in 3D jewelry production?
Lost wax casting is a production method where a wax or castable printed pattern is used to create a mold cavity for metal. The pattern is surrounded by investment material, then burned out, leaving the shape behind. Molten metal is poured or cast into that space, and the metal hardens into the form of the design. It is one of the most common ways digital jewelry files become real metal pieces, which is why designers should understand it even if they never run the casting process themselves.
Should I design differently for prototyping than for mass production?
In many cases, yes. A prototype may only need to prove shape, proportion, and general wearability. A production version may need cleaner tolerances, better repeatability across sizes, and details adjusted for finishing efficiency. For example, a decorative recess that looks fine in one sample may become too labor-intensive across a larger run. The closer you get to repeat production, the more your design should reflect consistency, assembly logic, and quality control requirements.
Key Takeaways
- Learning how to make 3d jewelry starts with one simple project, not advanced software mastery.
- Production-ready design depends on real measurements, proper thickness, and clean file preparation.
- Good 3D jewelry design connects directly to prototyping, casting, setting, polishing, and quality control.
- Beginners improve faster when they study wearable construction, not just visual styling.
- Digital jewelry skills can support both creative development and smarter business decisions for your collection.
Conclusion
If you are serious about learning how to make 3d jewelry, keep your first steps simple and disciplined. Choose one product type. Use exact measurements. Build the form before the decoration. Then test it in the real world through a prototype. That approach will teach you more than chasing advanced effects too early.
The biggest shift happens when you stop thinking of CAD as just drawing and start treating it as product development. Once you understand how a digital model becomes a finished piece, your design decisions get sharper. You create more wearable jewelry, communicate better with suppliers, and reduce costly revisions. That is valuable whether you want to make jewelry for beginners, develop custom pieces, or build a collection for sale.
If you want a practical partner perspective on design development and production, explore Royi Sal Jewelry’s resources or get in touch.


Responses (0)